Traveling or going on a vacation to a different city or country is therapy in itself. Yearly getaways from your everyday life can enhance mental peace and boost productivity. Therefore, everyone should travel at least once a year to grow as a human being and learn new stuff about the world. However, for some, traveling is incomplete until you share the shenanigans of your trip with your friends and family. We will guide you on how to post travel on Facebook for the world to know.
Also, read why it’s important to carry a bread clip and crayon in your wallet!
Takeaways
- You can post travel maps on Facebook to update your followers with your travel plans.
- You can also share photo albums from your trip to create digital footprints and look back on the memories once you are back.
- Tag people in your Facebook photos so they appear on your friends’ timelines.
What is Traveling and How to Store and Share Your Travel Memories Digitally on Facebook?
Before we get to the next part, let’s clarify what traveling means. Traveling refers to moving from one place to another over a considerable distance.
For example, you can travel between cities, countries, or even towns. Visiting your hometown from your current residence will also count as traveling since you are going to a different place.
The primary purpose why people usually travel is to refresh their minds and souls from hectic life. Countries that are home to the spectacular wonders of nature make the top travel destinations. Some of these are Europe, the United States, UAE, and more.
Moreover, traveling memories are the most cherished, and you will look back on your trip from time to time. You can create social albums and click many photos with your portable cameras or mobile phones to capture the treasurable moments from your travel. Besides, traveling trips become even more fun when you are with your friends.
On the other hand, you can also learn how to post travel statuses on Facebook and other social media platforms to create virtual footprints of your trips. Posting such statuses will not take much time, and you can get done with it within a few minutes with a good internet connection.
Also, if you are planning to stay in Dubai for a week, Here is a complete plan for maximum recreation, and if you’re confused about what airline to choose for flying to Dubai, check out our comparison of the 3 major gulf carriers.
How to Post Travel Journey Maps on Facebook
Facebook allows you to create posts where you can inform your mutuals about your travel plans. It is super-easy to navigate, and the whole posting process requires just a few taps on your phone screen.
However, before posting about your travel plans, ensure your account privacy is not Public. Otherwise, anybody on and off Facebook can track your plans, including potential thieves.
If you are confused about how to post a travel map on Facebook, follow the steps below. We have explained everything concisely and efficiently.
(For mobile phone and website users with the latest version of the Facebook App)
1. Log in to Your Facebook Account
Make sure you are signed into the account you wish to post from. It can be your account, your family’s, or any other work profile.
2. Tap on the “What’s on your mind?” Status Box
Once you are logged in, the app will take you to your Facebook newsfeed. Notice the “What’s on your mind?” box on the upper center of your phone screen. Tap on the box.

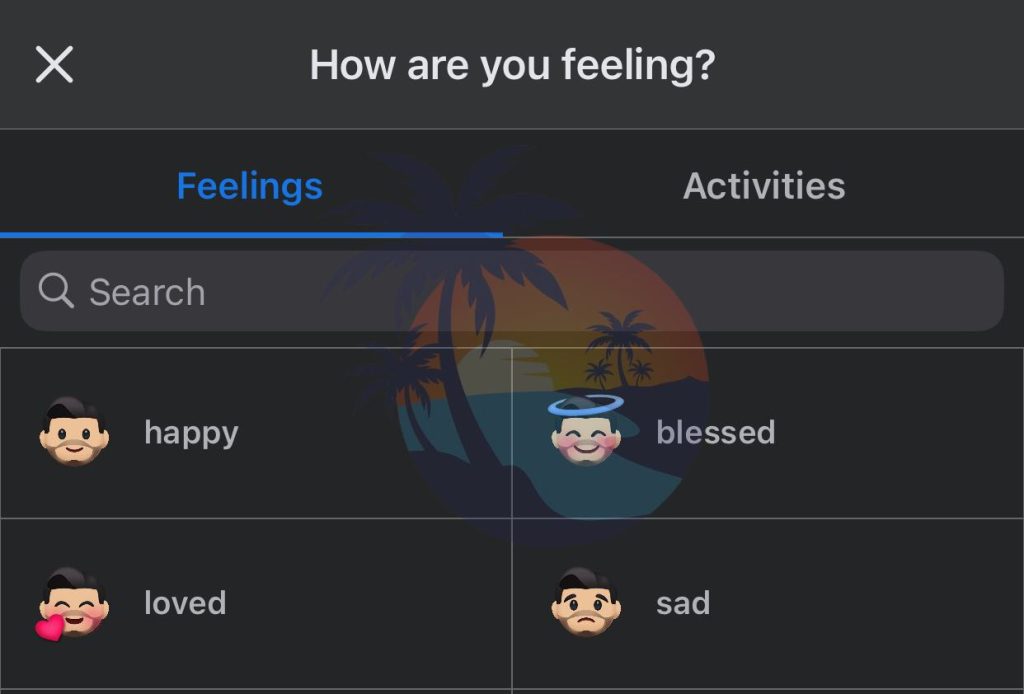
3. Select the “Feeling/Activity” Option
A drop-up menu will appear, showing many options, such as Photo/Video, Tag People, Camera, GIF, etc. Find the “Feeling/Activity” option. It is the third pick from the top. Click on it.

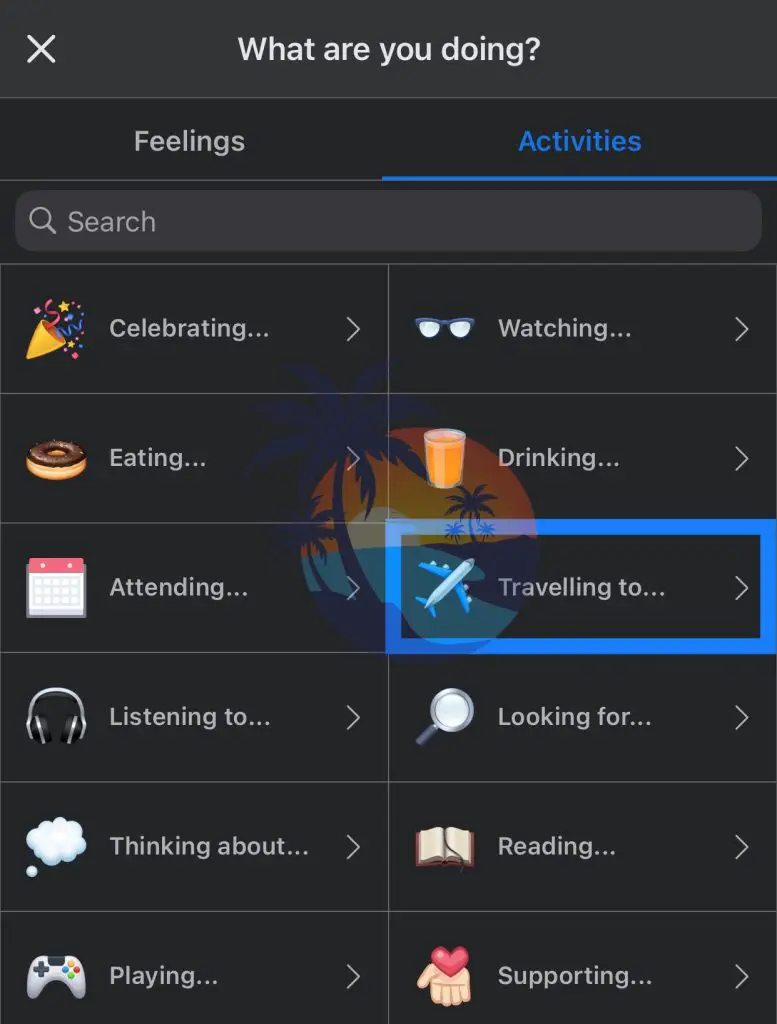
4. Switch to the “Activities” Column
It will take you to the next screen. You will see two columns on the top, reading “Feelings” and “Activities.” Move to the “Activities” column.
5. Select “Traveling to…” Box
You will now see another set of activities, for instance, “Watching,” “Looking for,” “Eating,” “Playing,” and more. Tap on the “Travelling to…” box that is third-right from the top. Tap on it.
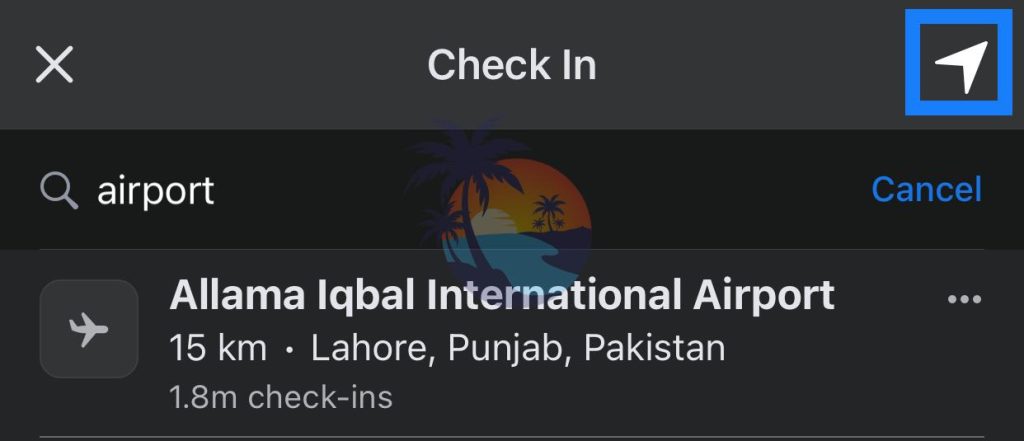
6. Pick Your Travel Destination from the Search Box
A list of potential travel destinations will appear on your screen. Type the name of the city and country you are traveling to. Once the word appears, tap on it.

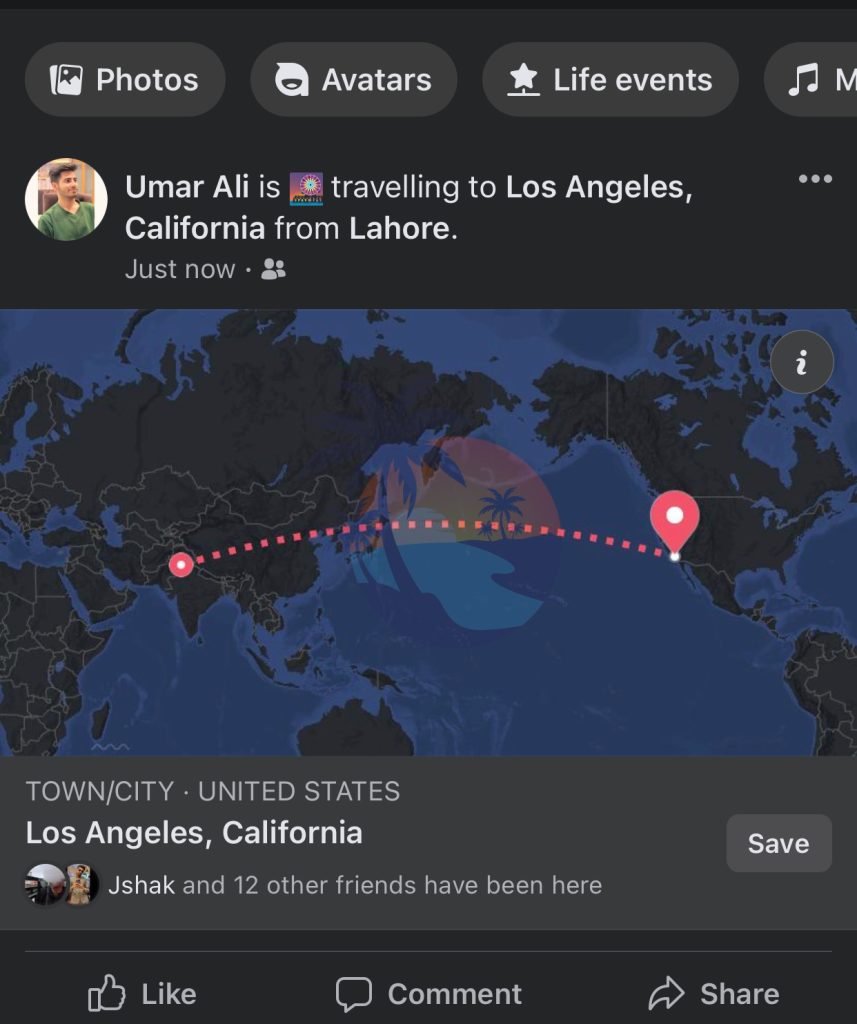
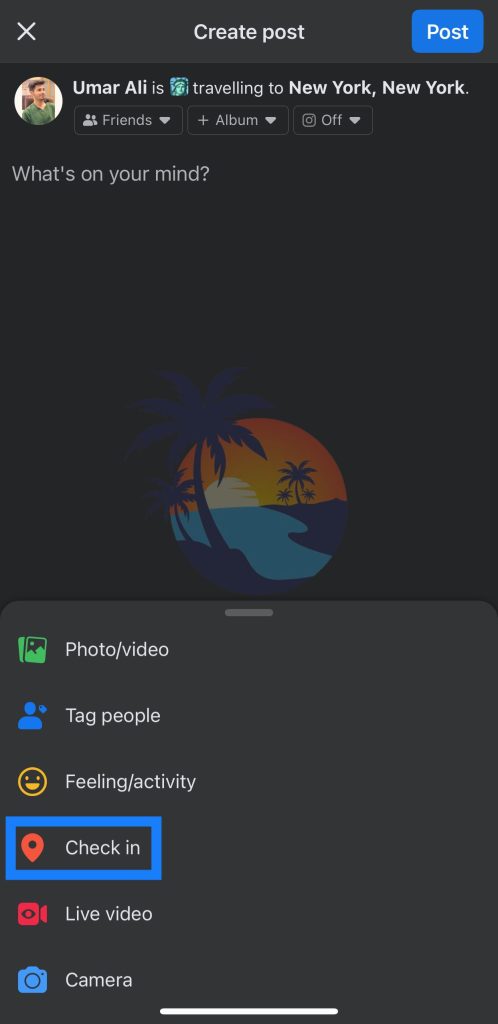
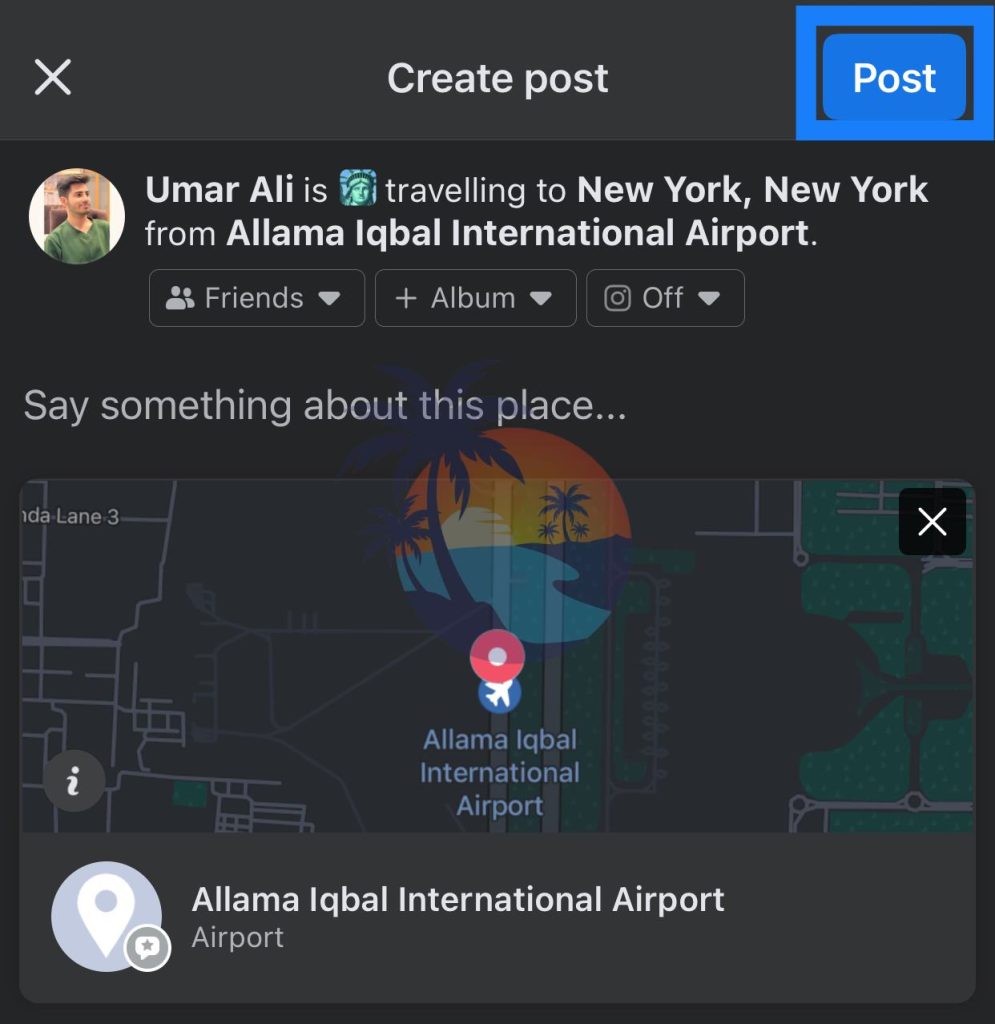
7. From the Create Post Screen, Select the “Check-in” Option
Facebook will add the travel destination to your status. You should be back at the Post bar. For the next step, tap on the “Check-in” button to create a travel map.
8. Choose your Current Location
- You will see a search bar. Type the name of the city you are currently in and tap on it from the search results. It will take you back to the Post Bar.
- Or you can just click on the ‘current location’ button near the search bar.
9. Hit the “Post” Button
A travel map will now appear leading from your current location toward your destination. Hit the “Post” button on the top-right corner of your screen. The travel map will be visible on the newsfeeds of your friends and family.
Using these simple steps, you can learn how to post travel destinations on Facebook, so if you have friends in the same country, you can all meet up and have a fun time together.
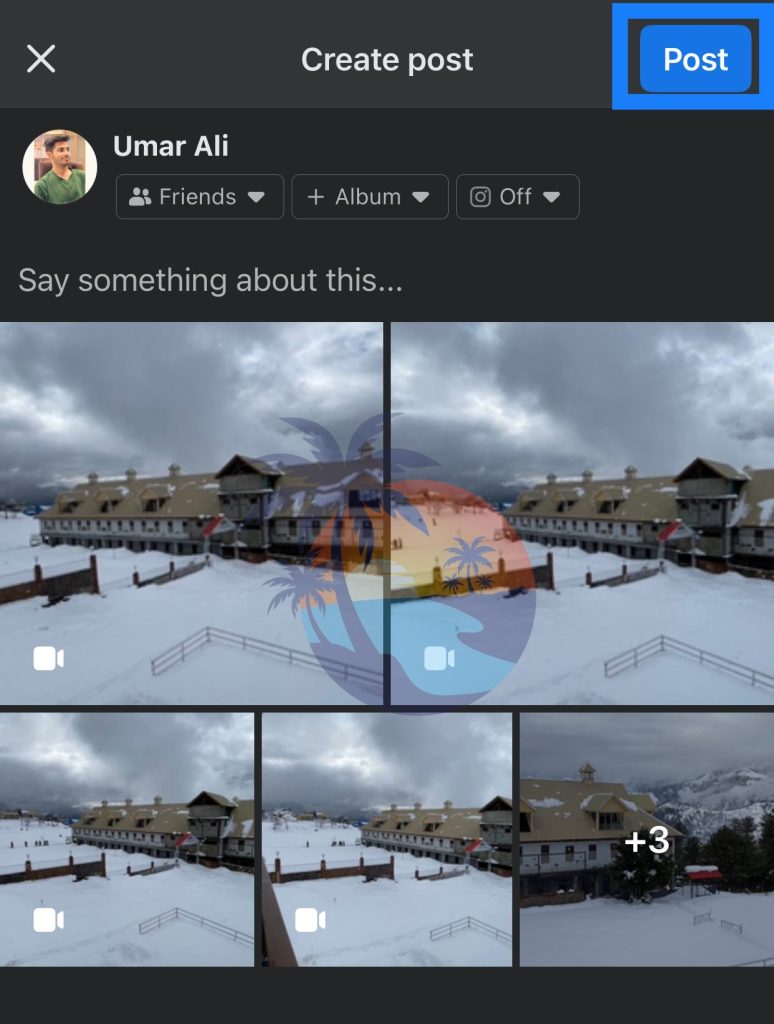
How to Share Travel Photos on Facebook
Posting pictures from your trips can be an excellent way to let your loved ones know you are doing fine. In addition, photos act as a great reminder of the good times you spent with your favorite people or visiting the place your love.

Thus, in this guide, we will also touch on sharing trip photos. However, make sure your privacy is set to “Friends” only. Here’s how you share travel pictures on your Facebook account.
Interesting Read: The 6 Best Women-Led Restaurants in New York
1. Login to your Facebook Account
Check that you are logged in to the correct account through which you want to share the photos. The app will take you to the newsfeed.
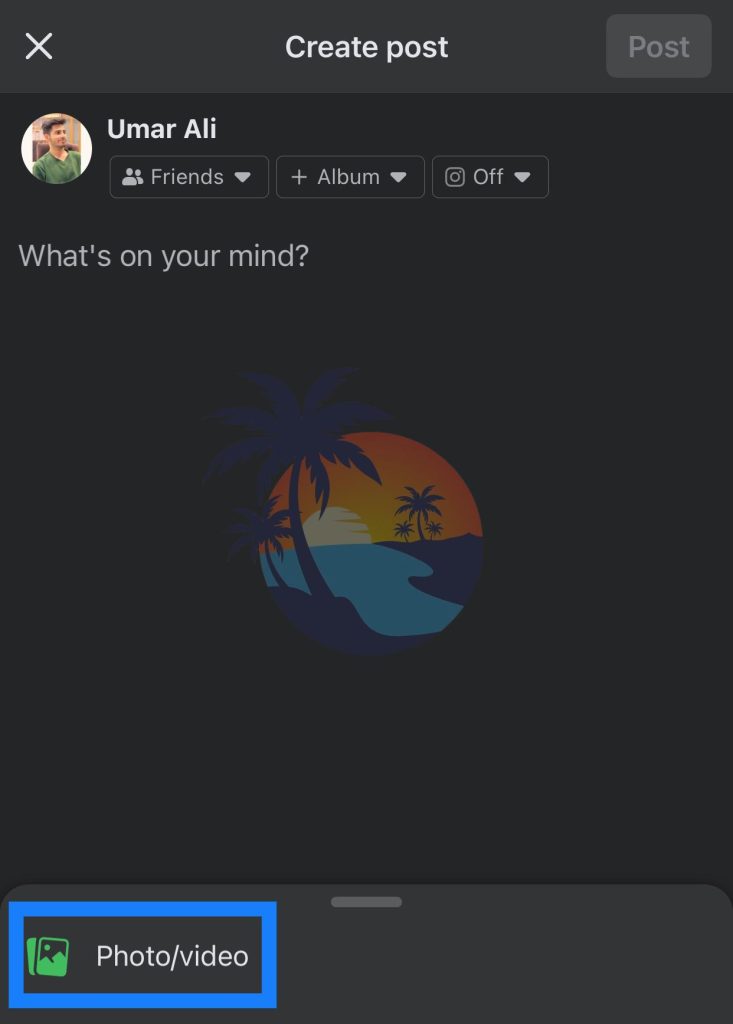
2. Tap on the “What’s on your mind?” Status Box
Locate the “What’s on your mind?” box in the upper center of your phone screen. It should be the first thing you see in your newsfeed before the posts. Click on it.

3. Click on “Photos/Videos”
A menu will appear from the bottom when you are taken to the enlarged version of the status box. It has options, like “Tag People”, “Check-in”, “Photos/Videos”, and more. Choose the “Photos/Videos” tab that is the first choice on the menu.
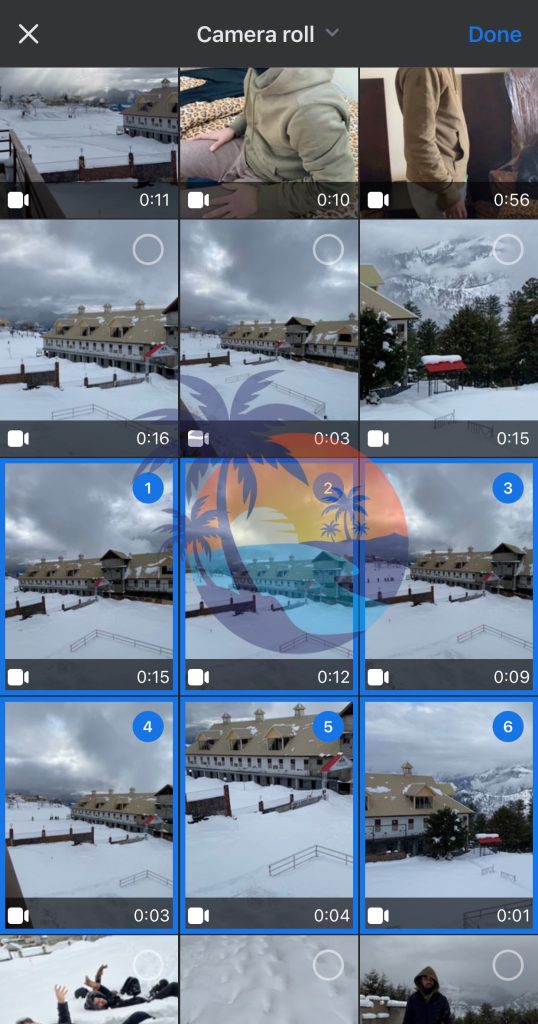
4. Select the Pictures
You will see your gallery on the next screen. Choose as many photos or videos as you want to post in the Facebook status.
5. Tag People
Facebook also lets you Tag people within your photos. Click on the picture and tap on their face. A box will appear where you can search for the person’s name and tag them. However, by doing so, the photo will also be visible to your friend’s Facebook friends.

6. Post the Pictures
Click “Done,” and you will return to the main Post Bar. Tap the Post button, and Facebook will upload the pictures within a few minutes for everyone to see.
Final Words
We hope you have learned enough about how to post travel on Facebook from our guide. Navigating through the Facebook app is easy if you are a regular platform user. Even if you are new to it, you can quickly learn your way around the social media app within one to two weeks of daily use.
So, have a fun traveling trip and share lots of pictures!
 Reviewed by Sara Anwar